How to launch a campaign with video banners
Click . Select .
Enter the site URL.
- Step 1. Create an ad
-
Upload images and videos from your computer. Use image files (JPG or PNG, up to 150 KB) and a video clip with an aspect ratio of 16 : 9, preferably under 15 seconds in length. After the files are uploaded, the video banners are automatically generated, and you can customize the video location on the page:
- To the right or left for horizontal templates.
- Above the image, below the image, or all the options at once for vertical templates.
Add the ADFOX tag or Yandex Metrica pixel to count ad impressions.
To specify a single tag for all banners, on the Configure all tab, enter the ADFOX tag or specify a link to the Yandex Metrica pixel. The tag or pixel must include the
%random%macro. They must also supportHTTPS. The maximum number of tags is 4.You can only use 1 video per ad group. To create video banners with different videos within the same campaign, create multiple ad groups.
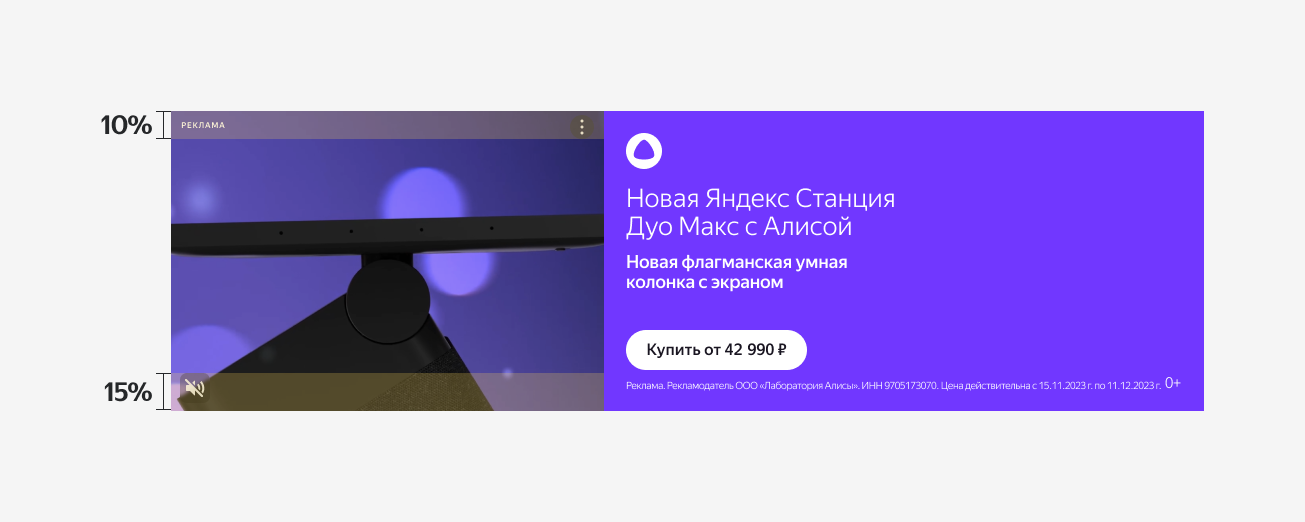
When building your creatives, keep in mind that the interface elements may overlap some (safe) areas. Therefore, don't place any text, logo, or other elements there.
Vertical

Horizontal

Examples of safe area locations in different video banner formatsIn most cases, the safe areas are positioned as shown in the examples above. However, there may be some exceptions.
- Step 3. Define your audience
-
Select the display regions.
Specify the user profile: this is the set of characteristics of the users that you want to serve your ads for. You can combine the following criteria:
- Demographic profiles.
- Interests.
- Habits and behavior.
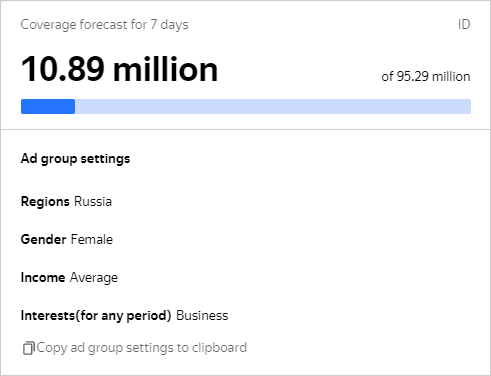
In the section on the right, you'll see the total number of unique users that match the characteristics specified in this step.
If you have multiple targeting criteria, the intersection of their targetings is used. For example, if you select both interests and devices in settings, then the selected audience will satisfy both criteria. This might decrease your campaign reach.
Inside a targeting criteria, targetings are combined. For example, if you enter multiple interests, the audience that has at least one of them is selected. This way you can increase your campaign reach.
- Step 3. Enter a budget and choose a strategy
-
Specify the start and end date of the campaign.
Set your budget for this period.
Choose a strategy:
- Decrease price for repeat impressions to launch new products and services on the market.
- Maximize impressions for lowest price to promote products and services with a target audience
- Growth of Search queriesβ to increase the share of search queries for a brand and its products after the display ad is served. You can create a campaign with this strategy only when you launch a Search Liftβ survey.
- Growth of site visitsβ to increase the number of site sessions after the display ad has been served. You can create a campaign with this strategy only when you launch a Visit Liftβ survey.
- Conversion growth on the siteβ to make your display ads generate more onsite conversions. You can create a campaign with this strategy only when you launch a Target Liftβ survey.
Enter the CPM
The section on the right will show the forecast of impressions for your campaign for the given budget and sizes of banners. The system will analyze all the settings and offer an updated recommendation for the CPM that will let you effectively use your budget during the period.
Set up impression restrictions if needed:
- enable and configure your ad impression frequency per user
- set impression limits by content type
- exclude specific sites
- select the types of devices to serve ads on
- Step 4. Enable advertising analytics
-
If the campaign meets the Brand Lift, Search Liftβ, Visit Liftβ, or Target Liftβ criteria, run the surveys.
Click Switch to professional interface to the right of the campaign name.
- Step 1. Go to the campaign creation page and set it up
-
Enter the campaign name.
Enter start and end dates for your campaign and a display strategy. We recommend automatic strategies:
- Decrease price for repeat impressions to launch new products and services on the market.
- Maximize impressions for lowest price to promote products and services with a target audience.
- Growth of Search queriesβ to increase the share of search queries for a brand and its products after the display ad is served. You can create a campaign with this strategy only when you launch a Search Liftβ survey.
- Growth of site visitsβ to increase the number of site sessions after the display ad has been served. You can create a campaign with this strategy only when you launch a Visit Liftβ survey.
- Conversion growth on the siteβ to make your display ads generate more onsite conversions. You can create a campaign with this strategy only when you launch a Target Liftβ survey.
If the campaign meets the Brand Lift, Search Liftβ, Visit Liftβ, or Target Liftβ criteria, run the surveys.
You can also cap impression frequency to limit how many times your campaign ads can be served to the same user.
- Step 2. Select ad type
-
Select banners as the ad type.
Enable the Video banners option.
All the ads in an ad group must be the same type, although a campaign can include all types of ads. You can't change the ad type after saving an ad group.
Select the display regions.
- Step 3. Configure audience accumulation for retargeting
-
You can accumulate an audience of users who have viewed a video from your campaign with a fixed CPM and then use it to configure retargeting.
Choose the events that interest you:
- video impression
- completed 25%, 50%, or 75% of video ad
- completed entire video
A separate segment is created automatically for each event in Yandex Audience, under the account hosting the Yandex Direct campaign. It will include users who started viewing or viewed 25%, 50%, or 75% of at least one video from the ad group (depending on the selected event).
To learn more, see Retargeting to a video audience.
- Step 4. Set up impression criteria
-
Ads from display campaigns are only served in the Yandex Advertising Network based on keywords, user profiles, or genres and subjects. You can only select one type of impression criteria per ad group. You cannot change the type of impression criteria after you save the ad group.
- User profile
-
A user profile consists of the cumulative characteristics of the users that you want to serve your ads to. These include gender, age, and online interests. Determine what your particular audience looks like and create a profile based on that data.
- Keywords
-
Keywords determine the site content and user interests that may trigger your ad impressions in the Yandex Advertising Network. For example, an ad about tours to Mars might be displayed on a page about traveling, or shown to a user who is interested in flights to Mars.
- Genres and subjects
-
Ads are served on the Advertising Network sites with the selected subjects or instream videos of the specified genres and subjects. For example, an ad for skiing equipment can be displayed on a page about sports and active holidays, and a restaurant ad can be displayed in a cooking video.
- Step 5. Add a creative
-
Design a creative using Ad Builder. For your creative, select a graphic file (JPG or PNG, up to 150 KB) and a video clip: in the 16 : 9 format, preferably up to 15 seconds in length.
After saving an ad, you can only replace the creative for that ad with other components of the same size.
When building your creatives, keep in mind that the interface elements may overlap some (safe) areas. Therefore, don't place any text, logo, or other elements there.
Vertical

Horizontal

Examples of safe area locations in different video banner formatsIn most cases, the safe areas are positioned as shown in the examples above. However, there may be some exceptions.
- Step 6. Enter a Yandex Audience pixel and impression tag
- You can use the Yandex Audience pixel to develop different scenarios of connecting with your display ad audience. The pixel is special code embedded in your advertising materials.
Create a pixel in Yandex Audience. For more information, see Yandex Audience Help.
Add the pixel code to the banner. After the impressions begin, the pixel starts to collect anonymous IDs of users who have seen your ad. You can use this data when you set up your retargeting.
You can use the ADFOX tag or Yandex Metrica pixel to count ad impressions for display ads. The tag or pixel must include the
%random%macro. They must also support HTTPS.
As an advertising data operator, Yandex assigns each creative a unique identifier referred to as "token" when creating campaigns. It uses this token to aggregate all your placement data and send it to the Unified Register of Online Advertising (ERIR). Learn more about ad labeling.
Reach forecast
- The total number of users is shown on the right. The number depends on the display regions you selected in the campaign settings, list of prohibited sites, and ad inventory adjustments.
- On the left, you'll see the number of users that could potentially see banners from the group. User profile settings, uploaded banner settings, display regions set for the ad group, and ad inventory adjustments are taken into account.

The values are also affected by disabling impressions for specific users through bid adjustments (minus 100%) set for a campaign or group. Weather bid adjustments are ignored.
Any changes you make to the campaign or ad settings immediately affects estimated data so you can evaluate your potential audience reach.
- A Yandex Audience segment based on location data (learn more in Yandex Audience Help).
- A Yandex Audience segment that was created less than 6 hours ago or more than two weeks ago and was not used in Yandex Direct.
- Bid adjustments for weather.
Ad moderation and launching a campaign
Click Send to moderation and confirm that you accept Yandex's terms for publishing your ad.
Moderators will check whether the ad follows the guidelines. It usually takes the moderators a few hours to review ads. On weekends and holidays, moderation may take longer than on weekdays.
Your moderation results will be emailed to the address you provided when you created the ad campaign.
Ad serving will begin as soon as Yandex receives your payment.
After you launch your campaign, you can view what your ads look like on a site.