Configure Keycloak version 19 and above
To set up single sign-on (SSO) to Yandex 360 services using Keycloak, you need to first create and configure a SAML application.
Step 1. Create and configure a SAML application
- Log in to the Keycloak admin account.
- Open the management console by clicking .
- Create a SAML application and configure it:
- In the panel on the left, select Clients and click Create Client.
- In the Client ID field, enter
https://yandex.ru/(with a slash at the end). - In the Client type field, enter SAML and click Save.
- In the Name field, specify the name of the application (for example,
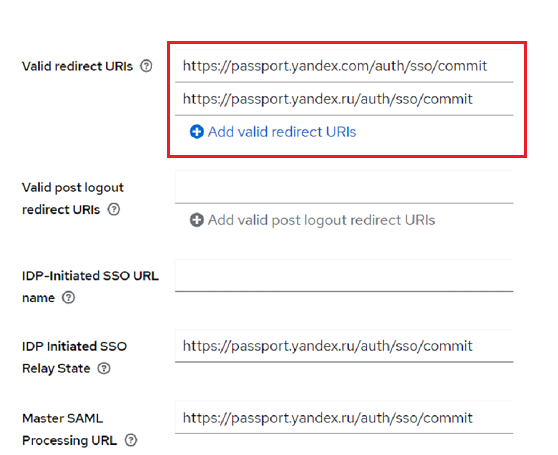
yandex360). - In the Root URL field, enter the Service URL:
https://passport.yandex.ru/auth/sso/commit. - In the Valid Redirect URIs field, enter the Service URL:
https://passport.yandex.ru/auth/sso/commitandhttps://passport.yandex.com/auth/sso/commit. - In the IDP Initiated SSO Relay State and Master SAML Processing URL fields, enter the Service URL:
https://passport.yandex.ru/auth/sso/commit. - Leave options that are filled in by default (Enabled, Include AuthnStatement, Sign Documents, and so on) unchanged.
In the Name ID Format field, select "email". In order for the selected format to be used regardless of the Yandex 360 settings, enable the Force Name ID format option.
Note.The NameID value is used to identify the user in Yandex ID and cannot be changed. If you change your UPN, set one of the immutable user attributes as NameID in your LDAP directory.
If you need a custom NameID, set it by default in the user attribute mapping settings: on the Client Scopes tab, open Client scope that corresponds to the client being created, for example:https://yandex.ru/-dedicated, and on the Mappers tab, create a new User Attribute Mapper For NameID (Add mapper – By configuration).If your employees use Yandex 360 services not only on the Russian domain, add the URLs with language-specific domains as endpoints to the Valid Redirect URIs field.
Endpoints for language-specific domains:
https://passport.yandex.com/auth/sso/commit(for English)https://passport.yandex.kz/auth/sso/commit(for Kazakh)https://passport.yandex.uz/auth/sso/commit(for Uzbek)https://passport.yandex.com.tr/auth/sso/commit(for Turkish)
https://passport.yandex.com/auth/sso/commithttps://passport.yandex.az/auth/sso/commithttps://passport.yandex.by/auth/sso/commithttps://passport.yandex.co.il/auth/sso/commithttps://passport.yandex.com/auth/sso/commithttps://passport.yandex.com.am/auth/sso/commithttps://passport.yandex.com.ge/auth/sso/commithttps://passport.yandex.com.tr/auth/sso/commithttps://passport.yandex.ee/auth/sso/commithttps://passport.yandex.eu/auth/sso/commithttps://passport.yandex.fi/auth/sso/commithttps://passport.yandex.fr/auth/sso/commithttps://passport.yandex.kg/auth/sso/commithttps://passport.yandex.kz/auth/sso/commithttps://passport.yandex.lt/auth/sso/commithttps://passport.yandex.lv/auth/sso/commithttps://passport.yandex.md/auth/sso/commithttps://passport.yandex.pl/auth/sso/commithttps://passport.yandex.ru/auth/sso/commithttps://passport.yandex.tj/auth/sso/commithttps://passport.yandex.tm/auth/sso/commithttps://passport.yandex.uz/auth/sso/commit
Full list- Click Save.
- In the Signing keys config section on the Keys tab, disable the Client Signature Required option if it is enabled, and click Save.
Step 2. Configure user attribute mapping
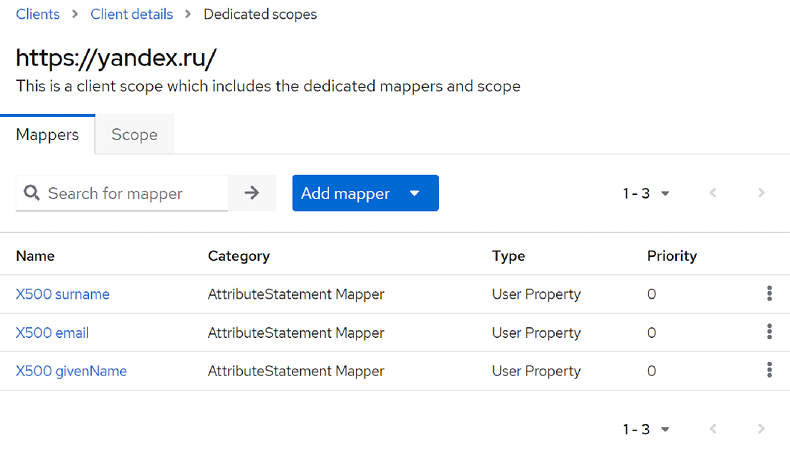
- On theClient scopes tab, open Client scope, that corresponds to the client being created, for example:
https://yandex.ru/-dedicated. - On the Scope tab, disable the Full Scope Allowed option.
- Go to the Mappers tab, click Add Mapper and select By Configuration.
- In the window that opens, select User Property.
- Create the attributes one by one:
X500 email: Email address.X500 surname: Last name.X500 givenName: First name.
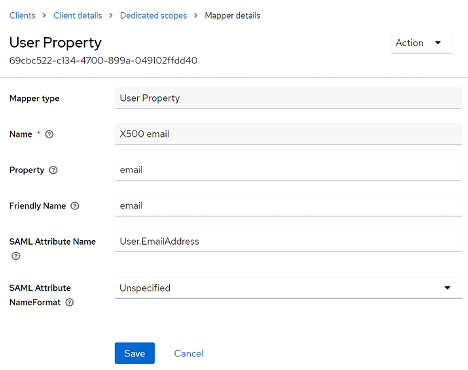
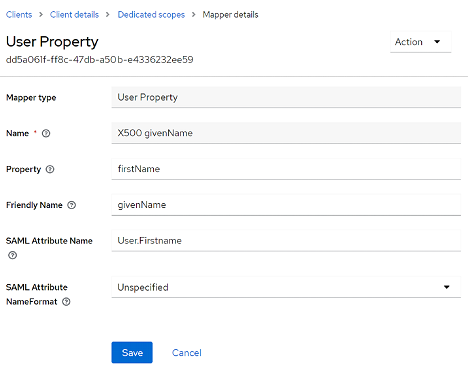
Set up syncing of Keycloak and Yandex 360 attributes by opening each attribute and changing the value of SAML Attribute Name. The SAML Attribute Name values that are supported in Yandex 360 are listed below.
SAML Attribute Name Value User.EmailAddress X500 email User.Firstname X500 givenName User.Surname X500 surname SAML Attribute Name Value User.EmailAddress X500 email User.Firstname X500 givenName User.Surname X500 surname The resulting attribute mapping will look like this:

The SAML response should look like this:
<Attribute Name="User.EmailAddress">
    <AttributeValue>[email protected]</AttributeValue>
</Attribute>
<Attribute Name="User.Surname">
    <AttributeValue>Surname</AttributeValue>
</Attribute>
<Attribute Name="User.Firstname">
    <AttributeValue>Firstname</AttributeValue>
</Attribute>
Step 3. Collect the data to be sent to Yandex 360
- Login page URL
-
Entry point address.
To get it:
In the management console on the left panel, select Realm Settings and click SAML 2.0 Identity Provider Metadata.
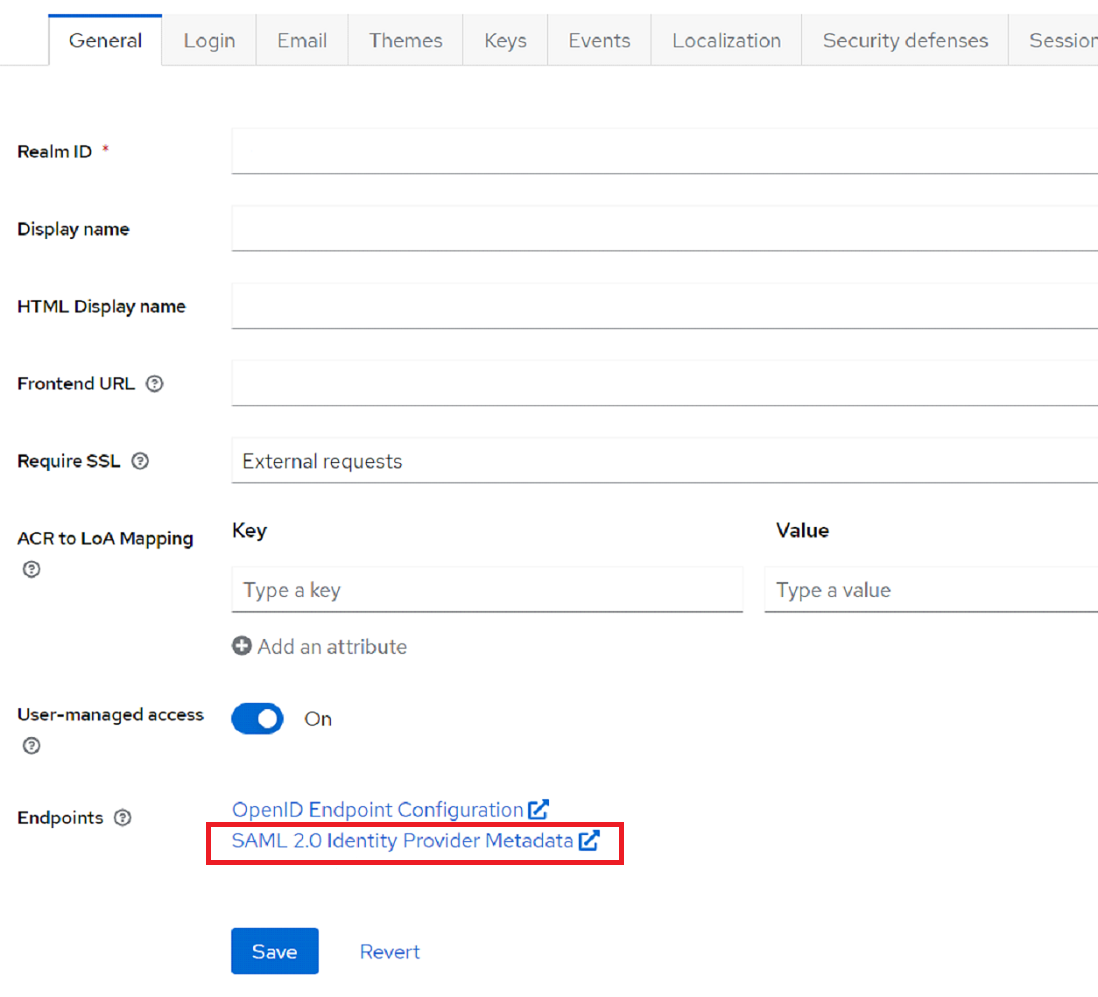
Copy the value of the Location field.
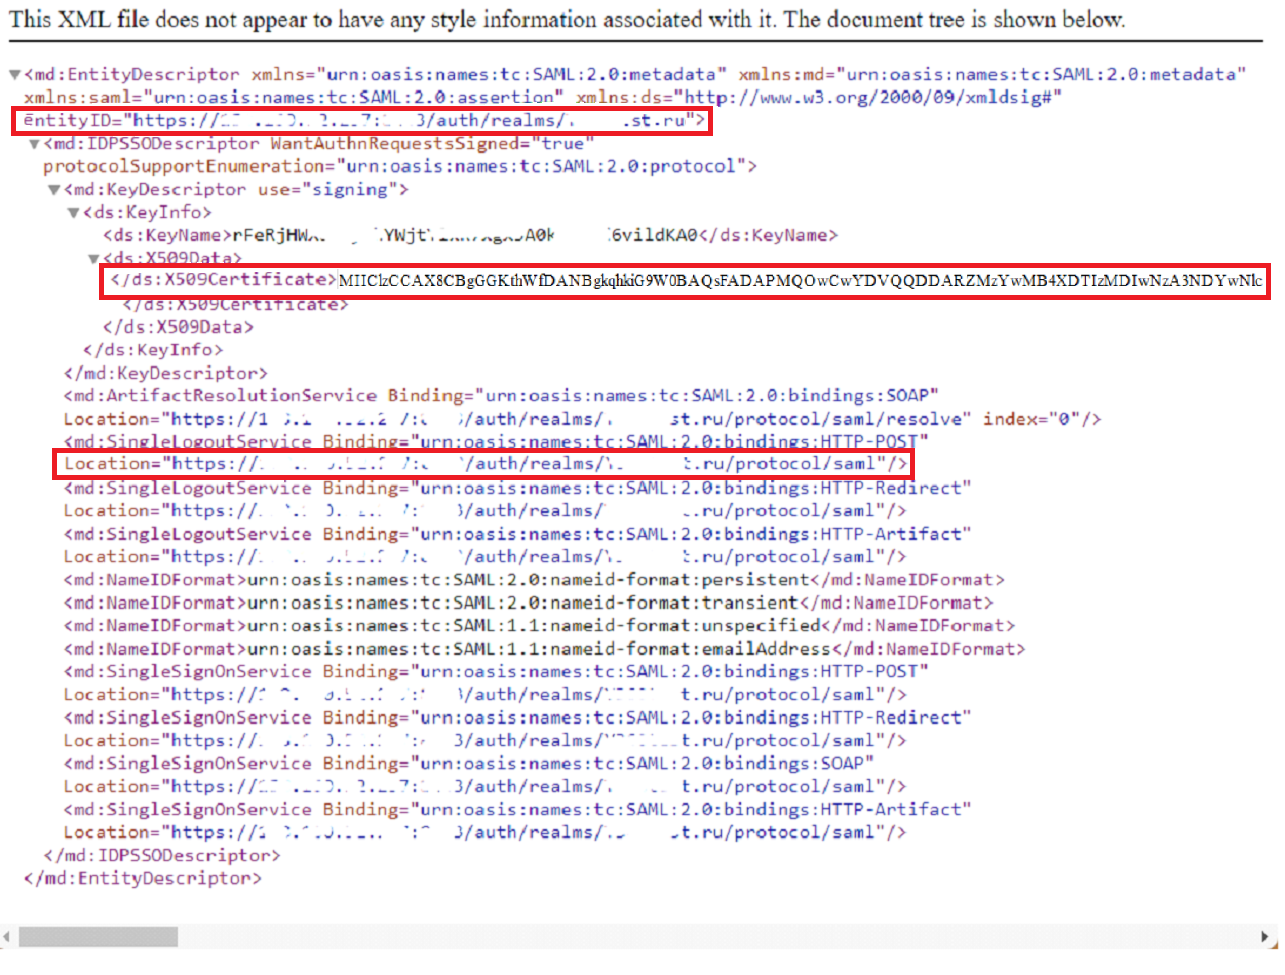
- Identity provider publisher
- Domain entity ID.
- Verification certificate
- X.509 token-signing certificate.
-
- Go to line RS256.
- Copy the contents of the Certificate field.
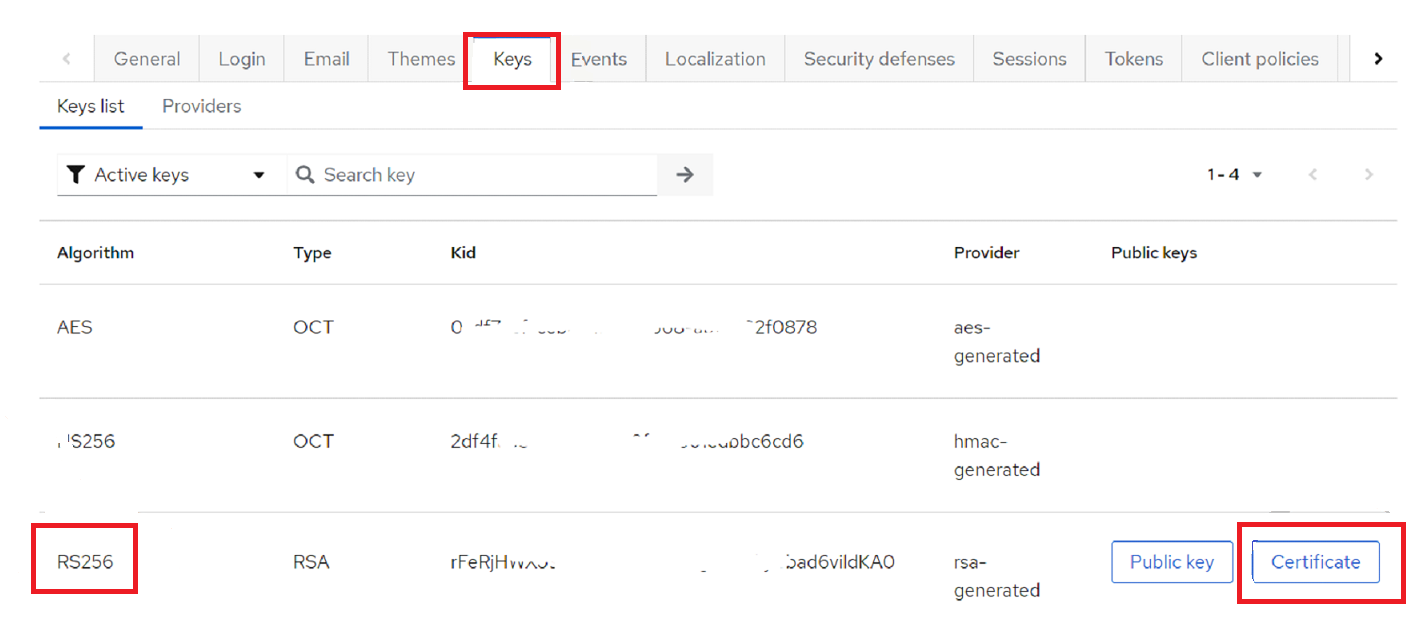
If you have two active token-signing certificates and you are not sure which certificate is currently being used, repeat the same actions for the second certificate.
After that, proceed to setting up Yandex 360 for Business.
Troubleshooting
If you enter invalid attribute values, when trying to log in via SSO you will see the "Login failed" message and one of the following error codes:
- email.no_in_response
-
Specify the attribute names in the format
User.Firstname,User.Surname,User.EmailAddress. If you use a different format, such asFirstname, you will not be able to log in. - samlresponse.invalid
-
This error occurs if you entered an invalid login page URL, identity provider publisher, or verification certificate. Check the SSO settings in Yandex 360 for Business.
- unsupportable_domain
-
Make sure that the domain in the
User.EmailAddressmail attribute in the SAML response is the same as your primary domain or one of the alias domains. If they don't match, you will get an error message.
